Tuesday, 30 July 2013

Server is not accessible You might not have permission to use this network resource

Server is not accessible. You might not have permission to use this network resource. Contact the administrator of this server to find out if you have access permissions.

Some time you cannot accessible the particular Server / Computer. At the mean time you can able to access other Servers / Computers. When trying to accessing you will get following error...


---------------------------
Windows Explorer
---------------------------
\\vss is not accessible. You might not have permission to use this network resource. Contact the administrator of this server to find out if you have access permissions.

The user name could not be found.
---------------------------
OK 
---------------------------


Reason of an Issue:

You was changed domain / user's login. Also you was saved Path, Username and Password when previous accessing time. Due to this reason, when you trying to access,  it will search previously saved Path and Login details. So it was omitting error like that.

Solutions:

Go to Control Panel → and find User Accounts


Open User Accounts


Select Advanced tab


Click Manage Passwords and click the Remove button.

Then close it and try to access.

Enjoy!!!

Friday, 31 May 2013

Disable error console in opera

Disable error console in opera


In order to disable this window from popping up, type opera:config at address bar and search for “Error Console Filter”. You should see something similar to:

Clear the field such that the filter is empty, and then click on ‘Save’.

The error console shall bug you no more.

Enjoy!!!

Thursday, 30 May 2013

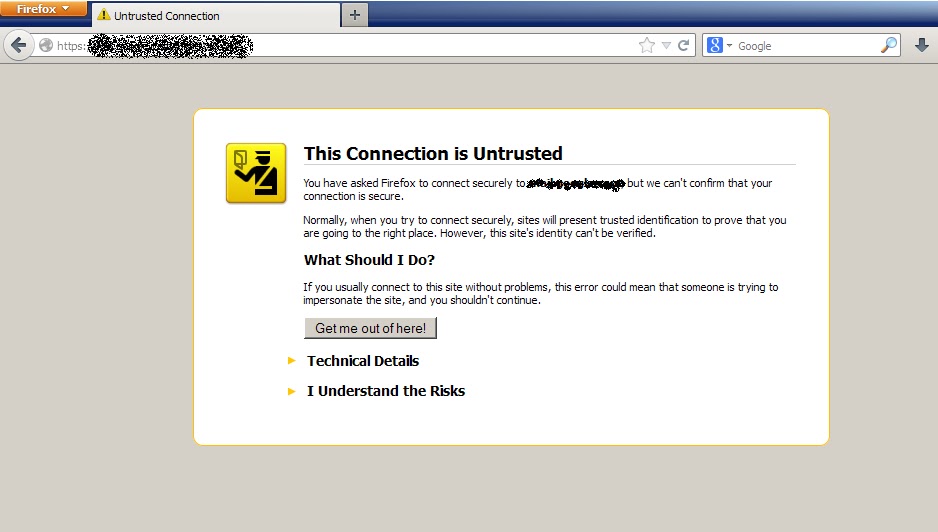
This connection is untrusted

This connection is untrusted


Some times you can face the Warning message "This connection is untrusted" when accessing secured (SSL certified - https://) websites such as Mail site, Banking site. But this is not an issue.

The main reason of the Warning message is Date and Time were changed in your Computer caused by CMOS (BIOS) battery fail in Mother board. After replaced battery, modify the Date and Time. Now your problem will be resolve.

Wednesday, 29 May 2013

Computer runs but no display on monitor

Computer runs but no display on monitor

Some time you Computer runs but no display on Monitor for fallowing reasons.
  1. After changed Monitor suddenly (Resolution is not match to new Monitor)
  2. If any problem in Display card (PCI) or Monitor cable
  3. If you play high quality Video (Graphic card is not supported to play)
To resolve this issue....
       Restart your Computer → Press F8 key before booting to OS → Select 'Enable VGA Mode' option → Press Enter → After boot to Operating System, then restart your compute again as Normally (Without pressing F8 key.

Wednesday, 22 May 2013

Move a certificate from IIS6 to IIS7

Move a certificate from Microsoft IIS 6.0 to Microsoft IIS 7.0


Step 1:  Export Certificate and Private Key from the IIS 6.0 server
Note: The following steps will create a backup copy of the current certificate and key, the process will not affect the functionality of the existing certificate on your server.
Create an MMC Snap-in for Managing Certificates: 
  1. Start > run > MMC
  2. Go into the Console Tab > File > Add/Remove Snap-in

  3. Click on Add > Click on Certificates and click on Add
  4.  Choose Computer Account
  5. Choose Local Computer
  6. Close the 'Add Standalone Snap-in' window.
  7. Click on OK at the 'Add/Remove Snap-in' window.
     
Export the Certificate with Private Key attached:
  1. Open up the Certificates Console Tree
  2. Look for a folder called Personal > Certificates
  3. Select the Certificate that you wish to back up.
  4. Right-click on the file and choose All Tasks > Export
  5. The 'Certificate Export Wizard' will start up. Click Next
  6. Choose Yes, export the private key
  7. Select Include all certificates in the certification path (This is optional) and click on Next
  8. Set a password to protect the export of the Private key file with the Certificate. Click on Next
  9. Choose to save the file to a set location. 
  10. Type the file name in the File Name box, and click Save.
  11. Click on Next  - The file is given a *.pfx file-name extension and should be saved to your hard disk drive. It is important to make a copy of the Private Key that does not reside on the actual server, in the event that the server crashes. 
  12. Click Finish
  13. A message will appear that states 'The export was successful' when the export has been completed. Click Ok.
     
Step 2: Import Certificate and Private Key onto the IIS 7.0 server  
  1. Open IIS Manager and navigate to the level you want to manage.
  2. In Features View, double-click Server Certificates.
  3. In the Actions pane, click Import.
  4. In the Import Certificate dialog box, do the following: Type a file name in the Certificate file box or click the browse button (…) to navigate to the name of a file where the exported certificate is stored. Type a password in the Password box if the certificate was exported with a password. Select Allow this certificate to be exported to be able to export the certificate, or clear Allow this certificate to be exported to not allow additional exports of this certificate.
  5. Click OK.
Step 3: Add an HTTPS binding to a Web site
In Microsoft IIS 7.0, the HTTPS protocol is required to be bound to a Web site which will also assign the installed certificate
  1. Open Internet Information Services (IIS) Manager (inetmgr)
  2. Browse to your server name > Sites > Your SSL-based site
  3. From the right hand Actions pane, choose Bindings
  4. In the Site Bindings window, choose Add
  5. From the Add Site Bindings window, select the binding type as https
  6. From the SSL certificate drop down, select the SSL certificate that will be used for this site
  7. Click OK

Friday, 17 May 2013

Chat with Friends through Command Prompt (CMD)

Chat with Friends through Command Prompt (CMD)

Hello friends Now you can Chat with other users / friends through Command Prompt . 

This is a Trick.

1) All you need is your friend's IP Address and your Command Prompt.

2) Open Notepad and write this code as it is.....!

@echo off
:A
Cls
echo MESSENGER
set /p n=User:
set /p m=Message:
net send %n% %m%
Pause
Goto A


3) Now save this as "Messenger.Bat".

4) Open Command Prompt.

5) Drag this file (.bat file) over to Command Prompt and press Enter.

6) You would then see something like this:


 7) Now, type the IP Address / Computer name of the computer you want to contact and press enter

You will see something like this:


8) Now all you need to do is type your message and press Enter.
Start Chatting.......!


Enjoy!!!